Build a Flight Tracker with the MyRadar iOS SDK
Search live flights and follow them over animated radar in a one-screen SwiftUI app built with the iOS SDK.
Oct 9, 2026 · Shell · Swift
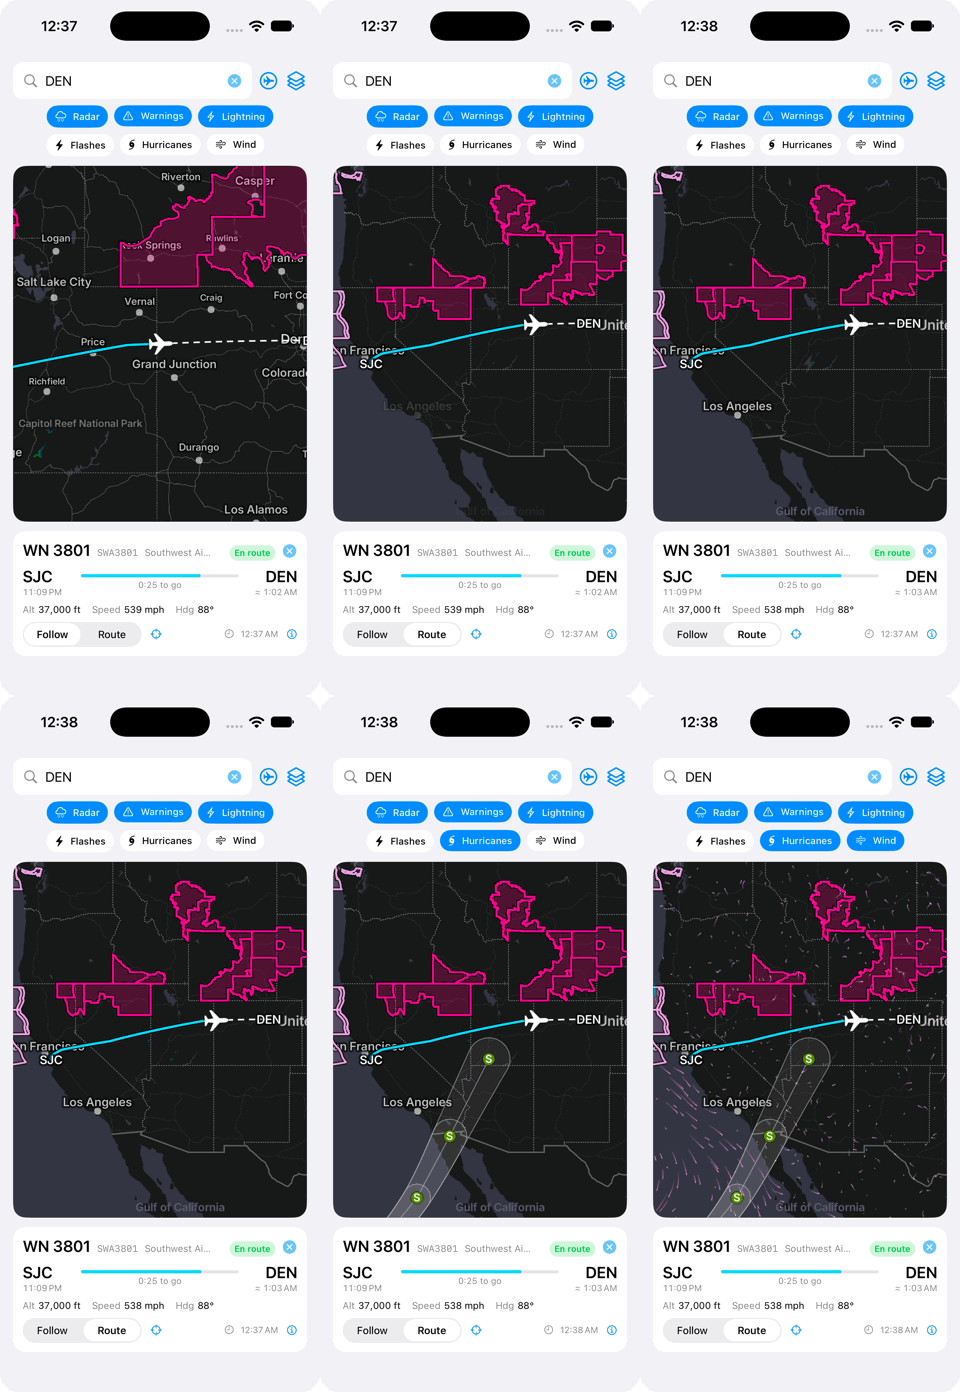
The SDK's demo app is a one-screen flight tracker: search for a flight, watch
it move over live radar, and switch weather layers on and off. This walkthrough
shows how each part of that screen is built with the public API. Every snippet
below is taken from the demo and trimmed for reading; the complete source is in
ios-demo in the
MyRadar SDK samples repository on GitHub.
Quickstart (command line)#
On a Mac with Xcode 16 or later, these commands clone the sample, build it and
launch it on a simulator with your key. Replace your-myradar-api-key, and set
SIM to any iOS 17 or later simulator from xcrun simctl list devices available.
export MYRADAR_API_KEY=your-myradar-api-key
git clone https://github.com/MyRadar/MyRadar-SDK-Samples.git
cd MyRadar-SDK-Samples/ios-demo

SIM="iPhone 16"
UDID=$(xcrun simctl list devices available | grep -m1 "    $SIM (" | grep -oE '[0-9A-F-]{36}')
xcrun simctl boot "$UDID" 2>/dev/null || true

xcodebuild -project MyRadarSDKDemo.xcodeproj -scheme MyRadarSDKDemo \
  -destination "id=$UDID" -derivedDataPath build \
  -packageAuthorizationProvider netrc -quiet build

xcrun simctl install "$UDID" build/Build/Products/Debug-iphonesimulator/MyRadarSDKDemo.app
SIMCTL_CHILD_MYRADAR_API_KEY="$MYRADAR_API_KEY" \
  xcrun simctl launch "$UDID" com.myradar.MyRadarSDKDemo
open -a Simulator --args -CurrentDeviceUDID "$UDID" 2>/dev/null ||
  open -b com.apple.dt.Devices --args -CurrentDeviceUDID "$UDID"
SIM can be any iOS 17 or later simulator; xcrun simctl list devices available lists them.
Booting a simulator that is already running is fine. The last command brings up the
simulator's window: in the Simulator app, or in Device Hub in newer versions of Xcode,
which replaces it. The app runs either way; without that window you just can't see it.
The first build downloads the MyRadarSDK package, so it takes a few minutes.
-packageAuthorizationProvider netrc stops xcodebuild from waiting on a
Keychain prompt for GitHub credentials, which the public package doesn't need.
The key reaches the app through the xcrun simctl launch command (SIMCTL_CHILD_
passes an environment variable to the launched app), so start the app with that
command again rather than from the simulator's home screen.
Run the demo#
You need a Mac with Xcode 16 or later, an iOS 17 or later simulator, and a MyRadar API key from the developer portal. If Xcode has no iOS 17+ simulator yet, add one under Xcode > Settings > Components (Platforms in Xcode 16).
1. Get the code#
git clone https://github.com/MyRadar/MyRadar-SDK-Samples.git
open MyRadar-SDK-Samples/ios-demo/MyRadarSDKDemo.xcodeproj
The first time the project opens, Xcode downloads the MyRadarSDK Swift
package from MyRadar-iOS-SDK-SPM,
about 5 MB. Wait until MyRadarSDK appears under Package Dependencies
in the project navigator before you build.
2. Add your API key#
The demo reads your key from an environment variable named
MYRADAR_API_KEY and passes it to MyRadarSDK.configure(apiKey:) at launch.
Set it in the Xcode scheme:
-
Choose Product > Scheme > Edit Scheme… (⌘<).
-
Select Run in the left column, then the Arguments tab.
-
Under Environment Variables, click + and enter:
Name Value MYRADAR_API_KEYyour API key -
Leave its checkbox ticked and click Close.
Xcode keeps this scheme in your user data, which the repository ignores, so the key stays on your Mac. Leave Shared unchecked at the bottom of the scheme editor; a shared scheme is saved in the project and would carry your key into git.
If you'd rather not use the scheme, put the key in DemoSecrets.swift in the
MyRadarSDKDemo folder instead, and don't commit the change:
private static let localAPIKey: String? = "your API key"3. Run it#
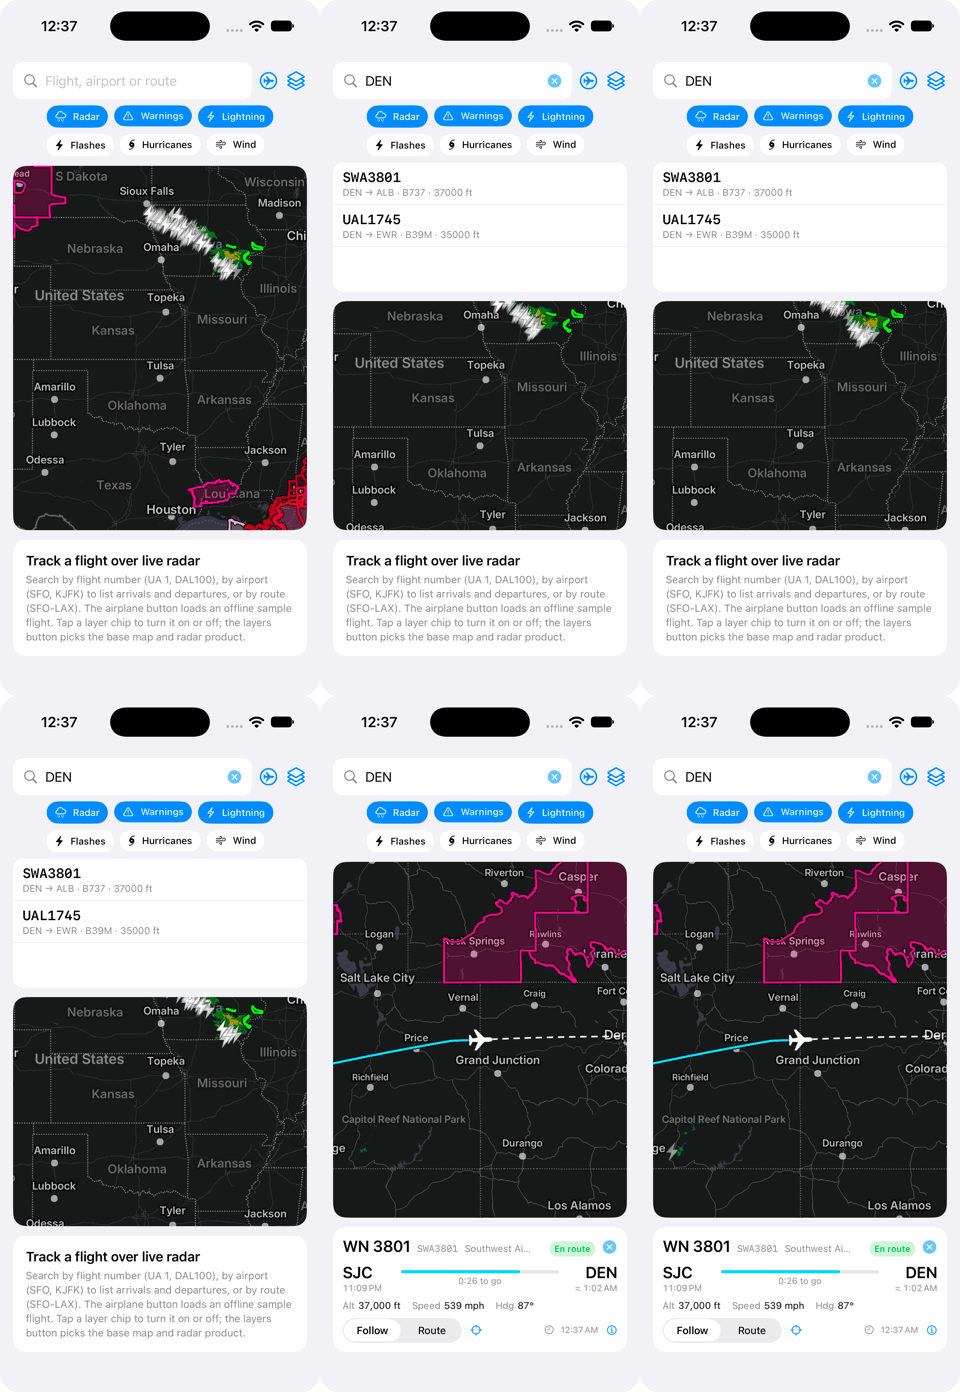
Pick an iPhone or iPad simulator from the run destination menu at the top of
the Xcode window and press ⌘R. Search for a flight number (UA 1), an airport
(SFO) or a route (SFO-LAX), or tap the airplane button for an offline
sample flight.
Check that your key works: radar and warning polygons appear on the map within a few seconds. All weather data comes through the MyRadar API gateway, so if you see the base map with cities and borders but no radar or warnings, the key is missing or was rejected:
- If Xcode's console shows
[MyRadarSDK] No API key, the app didn't receive a key. Check the variable name is exactlyMYRADAR_API_KEYand its checkbox is ticked. - Otherwise the gateway rejected the key. Check that the value has no extra spaces or quotes and that the key is active in the developer portal.
The environment variable reaches the app only when Xcode launches it. Start the demo with ⌘R each time rather than from the simulator's home screen.
To run on an iPhone or iPad instead, select the MyRadarSDKDemo target, open Signing & Capabilities, choose your team, and change the bundle identifier to one of your own.
What the screen does#
| Element | SDK API behind it |
|---|---|
| Map with radar, alerts, lightning, hurricanes, wind | MyRadarMap, .overlays(_:) |
| Layer chips and the base map menu | .radarEnabled(_:), .overlays(_:), .mapStyle(_:), .radarProduct(_:) |
| Opacity row: layer picker and slider | .radarOpacity(_:), .overlayOpacity(_:for:), Overlay.supportsOpacity |
| Flown path and remaining route | .polylines(_:) with MapPolyline |
| Aircraft icon and airport labels | .markers(_:) with MapMarker |
| Follow and Route camera modes | .camera(_:) with MapCamera, .visibleRegion(_:) |
| Tap on the plane or an airport | .onMarkerTap(_:) |
Flight positions come from a public ADS-B feed; the SDK supplies the map and
weather. The two meet in a small @Observable model that turns a tracked
flight into polylines, markers and a camera target.
Step 1: Add the package and your key#
Add the Swift package https://github.com/MyRadar/MyRadar-iOS-SDK-SPM
(File > Add Package Dependencies…), link its MyRadarSDK product to your
app target, then configure the SDK once at launch, before any map view exists.
import MyRadar_iOS_SDK

@main
struct MyRadarSDKDemoApp: App {
    init() {
        // DemoSecrets reads MYRADAR_API_KEY from the scheme (see Run the demo).
        if let apiKey = DemoSecrets.apiKey {
            MyRadarSDK.configure(apiKey: apiKey)
        }
    }
    var body: some Scene { WindowGroup { ContentView() } }
}
In your own app, load the key from wherever you keep secrets, such as a
git-ignored .xcconfig file read through Info.plist, rather than from an
environment variable. Xcode sets environment variables only for runs it
launches, so they never reach a build installed from TestFlight or the App
Store.
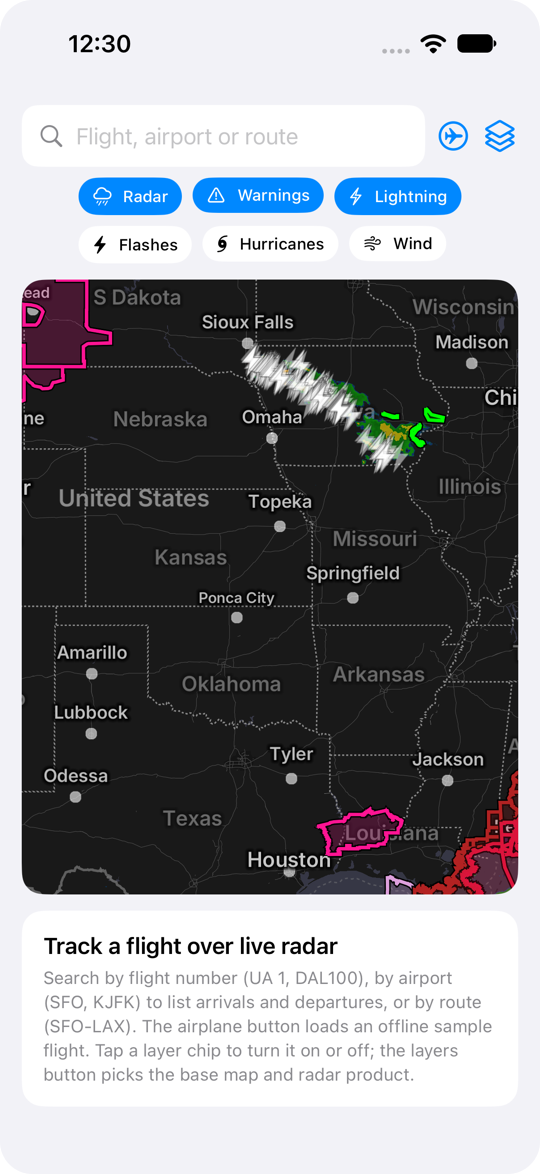
Step 2: Show the map and its layers#
The map is one view. Layer state lives in your own @State and flows in
through modifiers, so a toggle anywhere in your UI is a one-line binding.
@State private var isRadarEnabled = true
@State private var overlays: Set<Overlay> = [.warnings, .lightning]
@State private var mapStyle: MapStyle = .gray

MyRadarMap()
    .camera(center: CLLocationCoordinate2D(latitude: 37.5, longitude: -96), zoom: 5)
    .mapStyle(mapStyle)
    .radarEnabled(isRadarEnabled)
    .overlays(overlays)
    .clipShape(RoundedRectangle(cornerRadius: 16))
The chips row is a ForEach over Overlay.allCases; each chip inserts or
removes its case from the set.
ForEach(Overlay.allCases, id: \.self) { overlay in
    chip(overlay.displayName, isOn: Binding(
        get: { overlays.contains(overlay) },
        set: { on in on ? overlays.insert(overlay) : overlays.remove(overlay) }
    ))
}
Step 3: Let users dial in opacity#
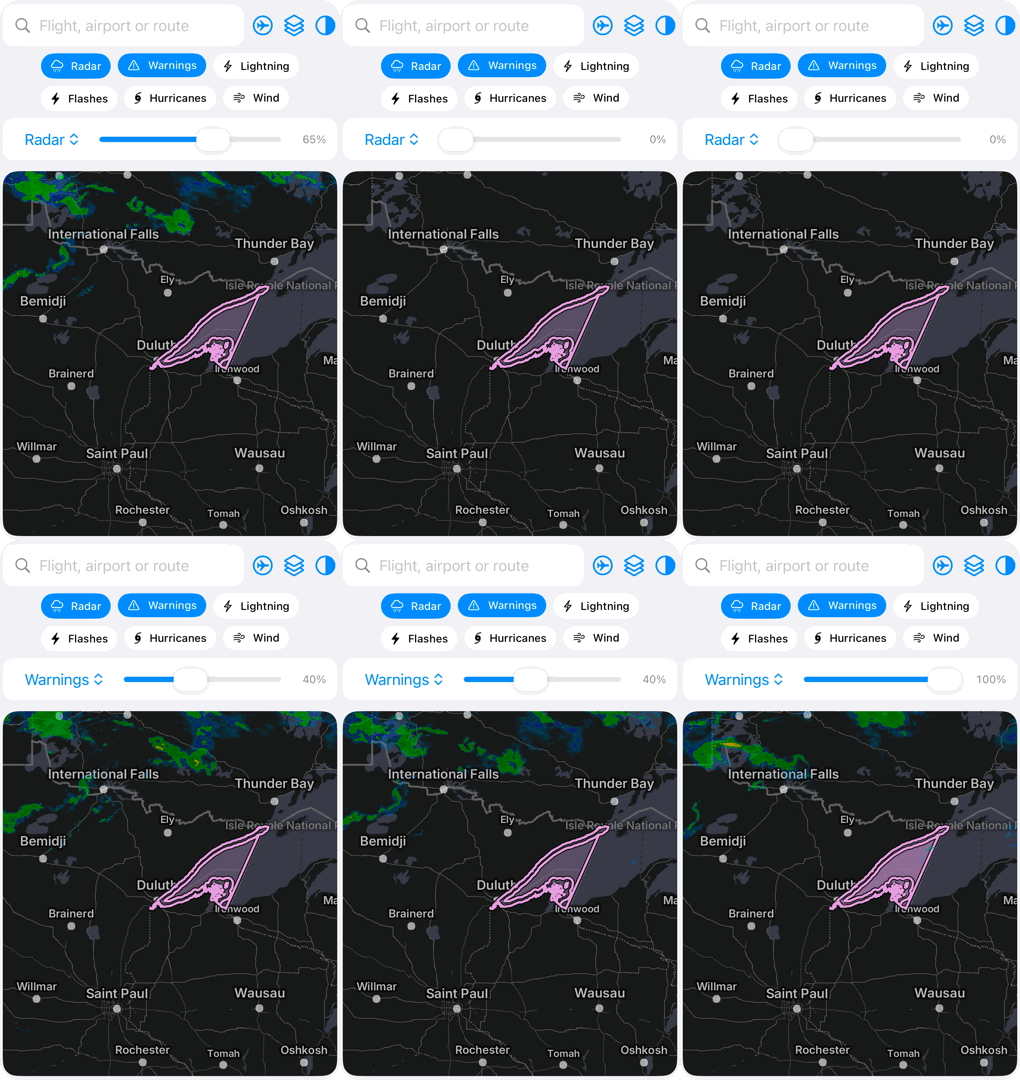
Radar has its own opacity; warnings, hurricanes and wind each take one too. The demo keeps a value per layer in state and feeds it through two modifiers. One picker plus one slider is enough UI, because the slider's binding just switches which value it reads and writes.
@State private var radarOpacity: Float = 0.65
@State private var overlayOpacities: [Overlay: Float] = [:]

var map: some View {
    var view = MyRadarMap()
        .radarOpacity(radarOpacity)
        .overlays(overlays)
    for (overlay, opacity) in overlayOpacities {
        view = view.overlayOpacity(opacity, for: overlay)
    }
    return view
}

// The picker lists radar plus every overlay where `supportsOpacity` is true.
HStack {
    Picker("Layer", selection: $opacityTarget) { /* Radar, Warnings, Hurricanes, Wind */ }
        .pickerStyle(.menu)
    Slider(value: opacityBinding, in: 0...1)
    Text("\(Int((opacityBinding.wrappedValue * 100).rounded()))%")
}
Lightning is drawn as markers and has no opacity, so it is left out of the picker. Warnings start at the SDK default of 40 percent; watches draw at half of whatever you set for warnings.
Step 4: Draw the flight#
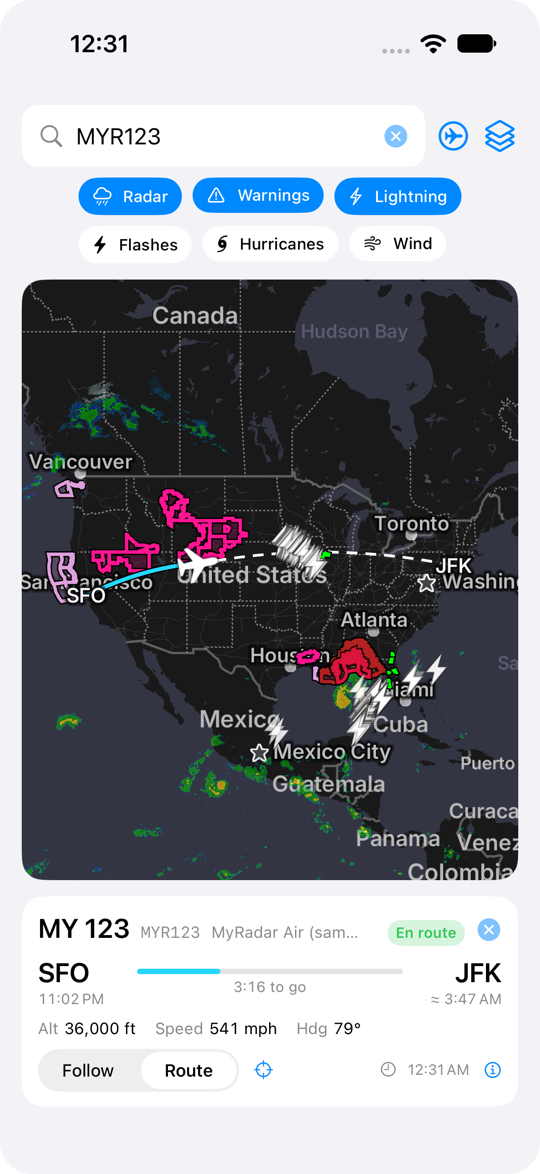
Two polylines and a few markers describe a flight. The flown path is the
aircraft's recorded track; the remaining route is a great circle to the
destination, drawn dashed. The aircraft marker is any UIImage that points
north, rotated by the reported heading.
var lines: [MapPolyline] = []
lines.append(MapPolyline(id: "flown", coordinates: track,
                         color: .cyan, width: 3, outlineColor: .black))
lines.append(MapPolyline(id: "remaining",
                         coordinates: GreatCircle.path(from: position, to: destination.coordinate),
                         color: .white, width: 2, dashPattern: [8, 6]))

var pins: [MapMarker] = []
pins.append(MapMarker(id: "origin", coordinate: origin.coordinate,
                      icon: .text(origin.code, color: .white)))
pins.append(MapMarker(id: "aircraft", coordinate: position,
                      icon: .image(planeIcon), heading: trueHeading,
                      userInfo: ["callsign": callsign]))

MyRadarMap()
    .polylines(lines)
    .markers(pins)
    .onMarkerTap { marker in show(marker.userInfo["callsign"]) }
Replacing the arrays redraws the layer, so pushing a new aircraft position every ten seconds is all it takes to animate the plane.
Step 5: Follow the plane or show the route#
Two camera modes, two modifiers. Follow pins an exact zoom so the radar keeps morphing smoothly; Route fits every point of interest.
// Follow: exact center and zoom. Whole-number zooms keep motion morphing on.
.camera(MapCamera(center: position, zoom: 6))

// Route: fit origin, aircraft and destination.
.visibleRegion(MyRadarMapView.region(fitting: [origin, position, destination],
                                     paddingFraction: 0.35))
Pass nil to either modifier to leave the camera under the user's control.
Step 6: Make it work in landscape#
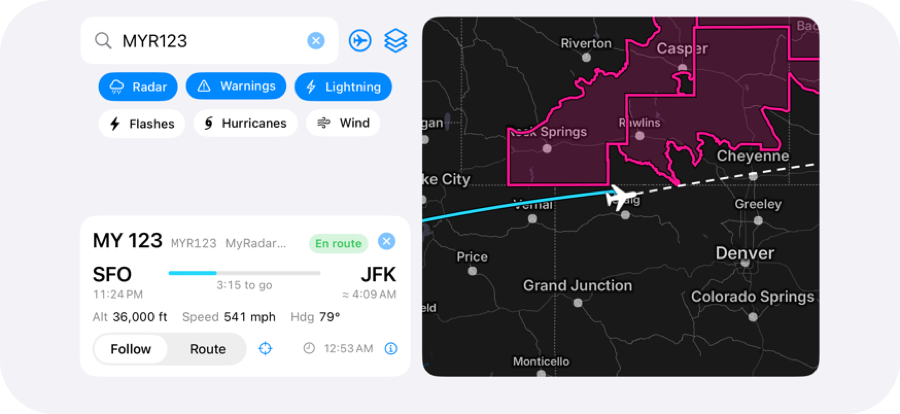
Keep one map instance and only change its container. SwiftUI's AnyLayout
swaps between a horizontal and a vertical stack without recreating the map, so
rotation never interrupts the radar loop.
let layout = isLandscape
    ? AnyLayout(HStackLayout(alignment: .top, spacing: 12))
    : AnyLayout(VStackLayout(spacing: 12))

layout {
    VStack { searchBar; chips; if isLandscape { Spacer(); flightCard } }
        .frame(width: isLandscape ? 360 : nil)
    mapPanel
    if !isLandscape { flightCard }
}
Step 7: Show attributions#
Apps that ship the SDK must display its open source licenses and data attributions. The demo puts them behind the info button on the flight card.
Text(MyRadarMapView.licensesAndAttributions.map(\.name).joined(separator: ", "))Where the flight data comes from#
This part is the demo's, not the SDK's, but it shows how little is needed.
| Need | Source |
|---|---|
| Position, heading, speed, aircraft type | api.adsb.lol live ADS-B (keyless, ODbL) |
| Recorded track for the current leg | adsb.lol per-aircraft trace files, with OpenSky as a fallback |
| Filed route with airport coordinates | api.adsb.lol route lookup, with adsb.lol's static route files as a fallback |
| Airport lookup by IATA code | hexdb.io |
| Airline name | api.adsbdb.com |
| Nearest airport to the track start | bundled OurAirports list (public domain) |
Scheduled times are not published for free, so arrival is estimated from distance and ground speed, and the departure time comes from the recorded takeoff when available.
Tips from building it#
- Position the camera at whole-number zooms (
MapCameraorsetCenter(_:zoomLevel:)) when you want motion-vector morphing. Half-step zooms and continent-wide views fall back to a cross-fade. - Lightning rides on the radar timeline. It only shows while the radar layer is enabled.
- Markers point north when unrotated. Pre-rotate your icon if it does not,
then let
headingdo the rest. - One map instance. Avoid
if/elsebranches that putMyRadarMapin different view identities; the map would be torn down and rebuilt.
The complete demo source is on GitHub in MyRadar-SDK-Samples/ios-demo.