Build a Flight Tracker with the MyRadar Android SDK
Search live flights and follow them over animated radar in a one-screen Jetpack Compose app built with the Android SDK.
Oct 13, 2026 · Shell · Properties · Kotlin
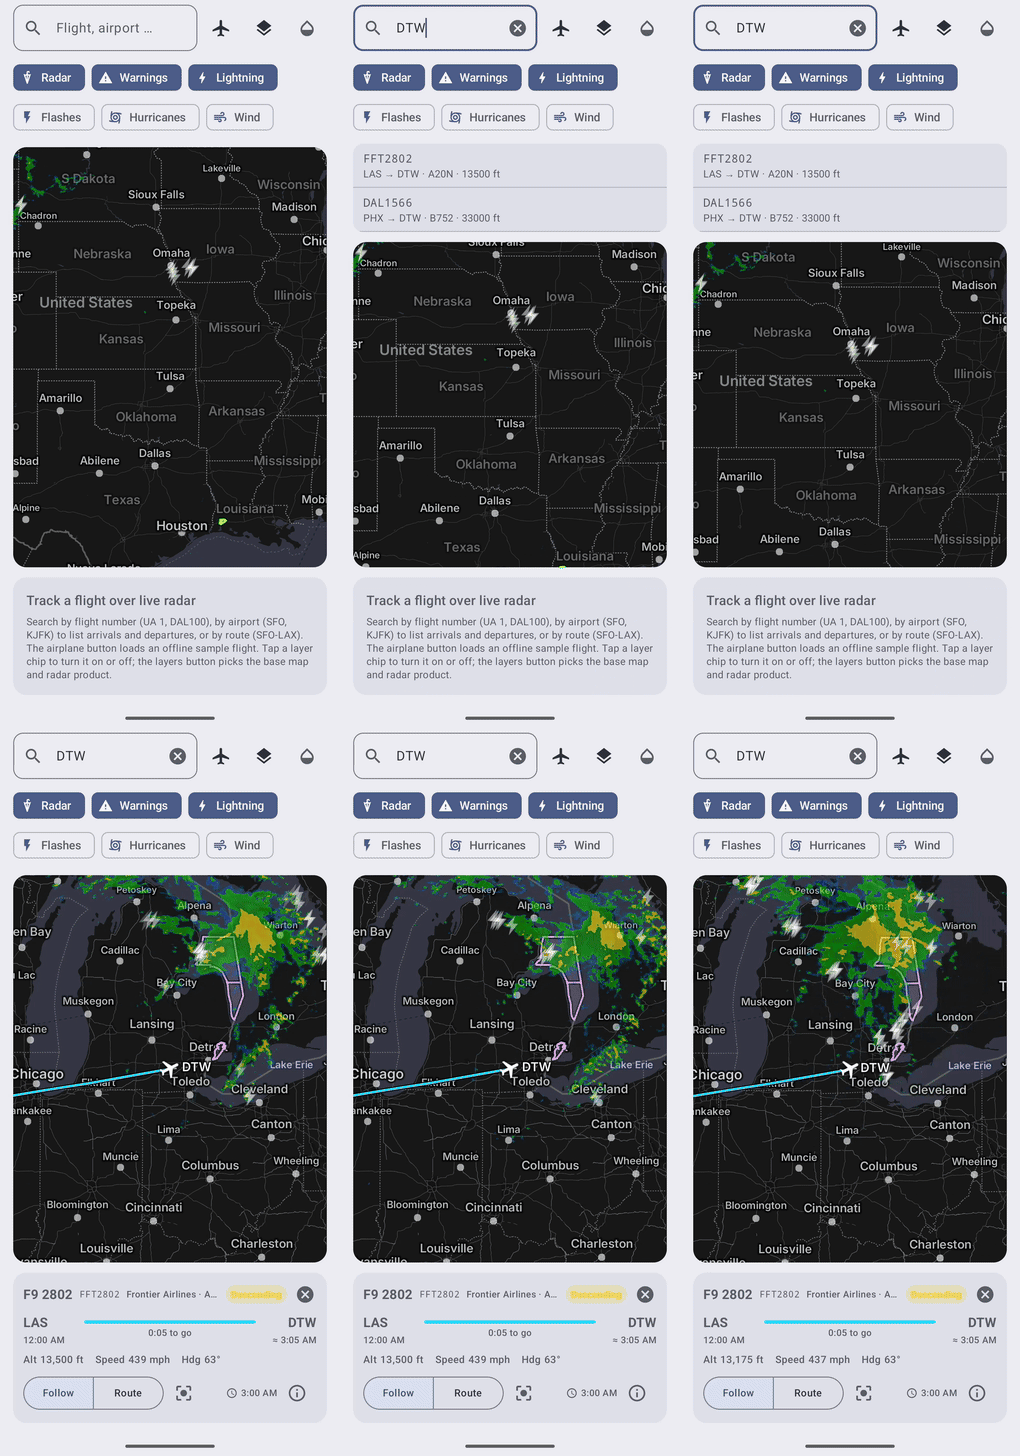
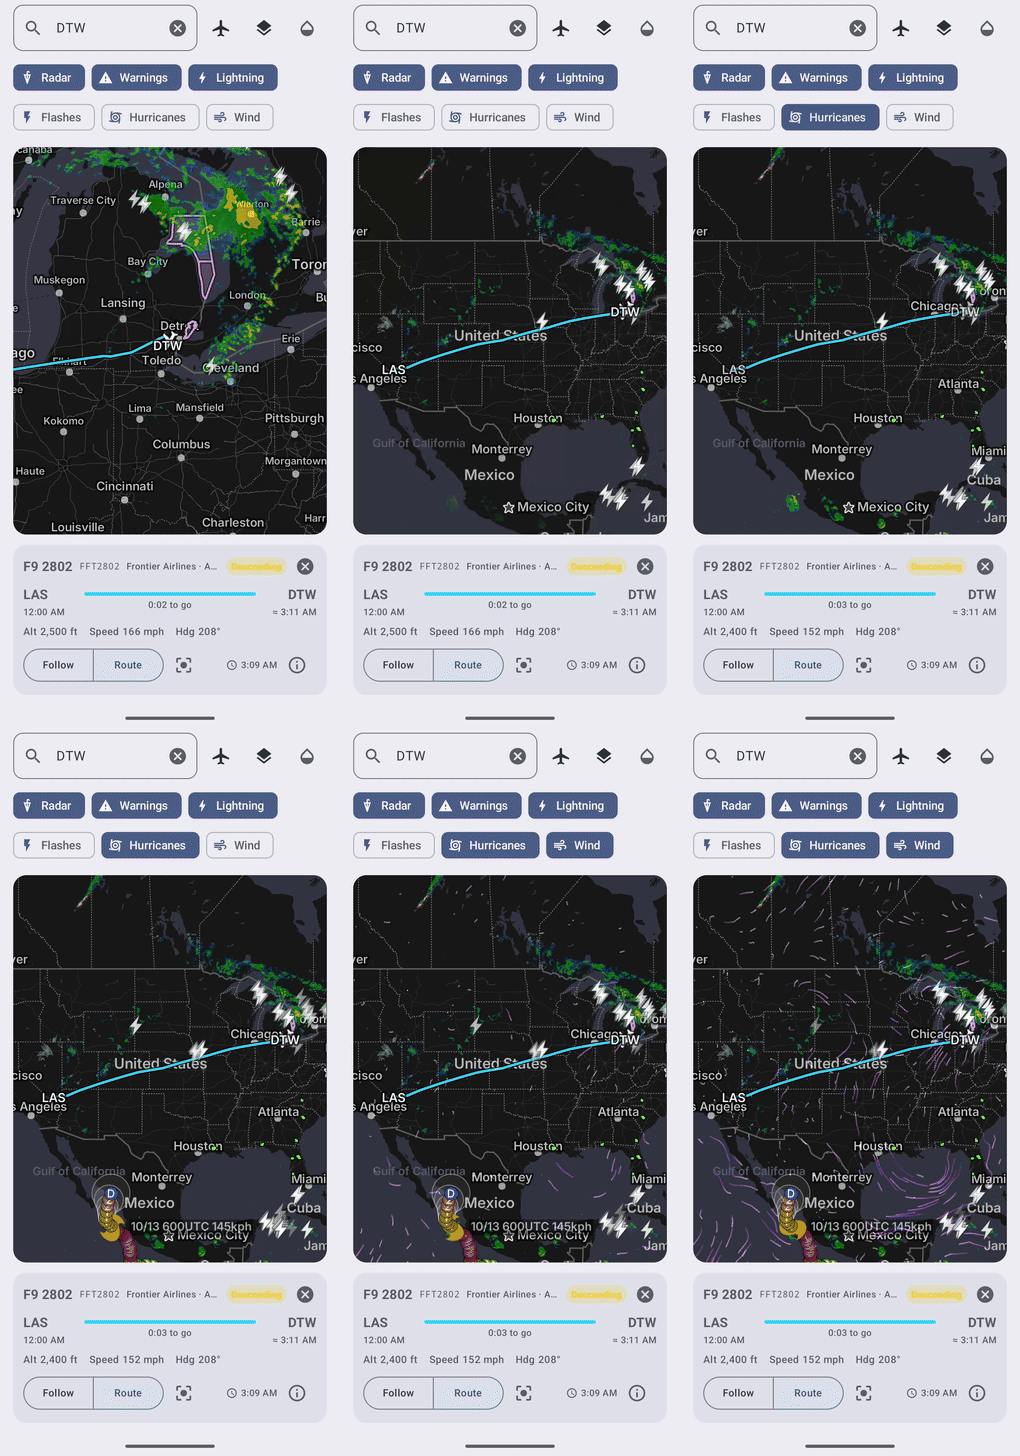
The SDK's demo app is a one-screen flight tracker: search for a flight, watch
it move over live radar, and switch weather layers on and off. This walkthrough
shows how each part of that screen is built with the public API. Every snippet
below is taken from the demo and trimmed for reading; the complete source is in
android-demo in the
MyRadar SDK samples repository on GitHub.
Quickstart (command line)#
With Android Studio installed, these commands clone the sample, start an
emulator, and build and launch the app with your key. Replace
your-myradar-api-key. The paths are Android Studio's defaults on macOS; on
Linux the SDK is usually in ~/Android/Sdk, and any JDK 17 or later works for
JAVA_HOME.
export MYRADAR_API_KEY=your-myradar-api-key
git clone https://github.com/MyRadar/MyRadar-SDK-Samples.git
cd MyRadar-SDK-Samples/android-demo

export ANDROID_HOME="$HOME/Library/Android/sdk"
export JAVA_HOME="/Applications/Android Studio.app/Contents/jbr/Contents/Home"
export PATH="$ANDROID_HOME/platform-tools:$ANDROID_HOME/emulator:$PATH"

emulator -list-avds
AVD=$(emulator -list-avds | head -1)
emulator -avd "$AVD" -cores 4 >/dev/null 2>&1 &
adb wait-for-device
until [ "$(adb shell getprop sys.boot_completed | tr -d '\r')" = 1 ]; do sleep 2; done

./gradlew :app:installDebug
adb shell input keyevent KEYCODE_WAKEUP
adb shell wm dismiss-keyguard
adb shell am start -S -n com.acmeaom.myradar.sdkdemo/.MainActivity
The last three commands wake the emulator's screen and restart the app. An emulator that
resumes from Quick Boot can come back with its screen asleep, which looks like a blank
screen. emulator -list-avds lists your emulators and the commands start the first one; if
the list is empty, create one in Android Studio's Device Manager first. The build
reads MYRADAR_API_KEY from the environment and builds it into the app, so after
changing the key, run ./gradlew :app:installDebug again. The
first build downloads Gradle, the Android build tools and the MyRadar SDK, so it
takes a few minutes.
Run the demo#
You need Android Studio (a current release, with the Android SDK for API 37; it installs missing SDK parts when the project first syncs), an emulator or device running Android 10 (API 29) or later, and a MyRadar API key from the developer portal.
1. Get the code#
git clone https://github.com/MyRadar/MyRadar-SDK-Samples.gitThe demo uses the SDK exactly as your app would: Gradle downloads
com.acmeaom.myradar:myradar-sdk from the MyRadar SDK Maven repository
(https://myradar.github.io/MyRadar-Android-SDK-Maven). There is nothing else to download.
2. Add your API key#
Create a file named local.properties in the android-demo folder (next to
settings.gradle.kts) with one line:
myradar.apiKey=your-myradar-api-keylocal.properties is git-ignored, so the key stays on your machine. At build
time the demo copies it into BuildConfig.MYRADAR_API_KEY, and
DemoApplication passes that to MyRadarSdk.configure(apiKey) at launch.
Android Studio adds an sdk.dir line to the same file when it opens the
project; leave it there. You can set the MYRADAR_API_KEY environment variable
instead of the file.
3. Run it#
In Android Studio choose File > Open, select the android-demo folder, and
wait for the Gradle sync to finish. Pick an emulator or a connected device and
run the app configuration. Emulators need at least two CPU cores, which the
default Android Studio phone has. From a terminal, with a device or emulator
running and ANDROID_HOME pointing at your Android SDK (Android Studio's
Settings > Languages & Frameworks > Android SDK shows where it is; on a Mac
it is usually ~/Library/Android/sdk):
export ANDROID_HOME="$HOME/Library/Android/sdk"
cd MyRadar-SDK-Samples/android-demo
./gradlew :app:installDebug
Search for a flight number (UA 1, DAL100), an airport (SFO, KJFK) or a
route (SFO-LAX), or tap the airplane button for an offline sample flight.
Check that your key works: radar and warnings appear within a few seconds.
- A "MyRadar SDK is not configured" notice on the map means the app was built
without a key. Check the property name is exactly
myradar.apiKeyand the file is inandroid-demo, then run the app again: the key is read at build time, so changing it needs a new build. - A map with no weather means the gateway rejected the key. To see each request
and its status, run
adb shell setprop log.tag.MyRadarSDK VERBOSEand thenadb logcat -s MyRadarSDK;401responses mean the key is wrong or not active.
What the screen does#
| Element | SDK API behind it |
|---|---|
| Map with radar, alerts, lightning, hurricanes, wind | MyRadarMap, overlays |
| Layer chips and the base map menu | radarEnabled, overlays, mapStyle, radarProduct |
| Opacity row: layer picker and slider | radarOpacity, overlayOpacities, Overlay.supportsOpacity |
| Flown path and remaining route | polylines with MapPolyline |
| Aircraft icon and airport labels | markers with MapMarker |
| Follow and Route camera modes | camera with MapCamera, visibleRegion with CoordinateRegion |
| Tap on the plane or an airport | onMarkerTap |
Flight positions come from a public ADS-B feed; the SDK supplies the map and
weather. The two meet in a small ViewModel that turns a tracked flight into
polylines, markers and a camera target, exposed as Compose state.
Step 1: Add the library and your key#
Add the MyRadar Maven repository and the dependency, then configure the SDK once at launch, before any map exists.
// settings.gradle.kts
dependencyResolutionManagement {
    repositories {
        google()
        mavenCentral()
        maven { url = uri("https://myradar.github.io/MyRadar-Android-SDK-Maven") }
    }
}

// app/build.gradle.kts
dependencies {
    implementation("com.acmeaom.myradar:myradar-sdk:1.0.0")
}class FlightTrackerApp : Application() {
override fun onCreate() {
super.onCreate()
MyRadarSdk.configure(apiKey = BuildConfig.MYRADAR_API_KEY)
}
}Keep the key out of source control. The demo reads it from local.properties
(git-ignored) into BuildConfig at build time:
// app/build.gradle.kts
val localProperties = Properties().apply {
    val file = rootProject.file("local.properties")
    if (file.exists()) file.inputStream().use(::load)
}
val apiKey: String = localProperties.getProperty("myradar.apiKey") ?: System.getenv("MYRADAR_API_KEY") ?: ""

android {
    defaultConfig {
        buildConfigField("String", "MYRADAR_API_KEY", "\"$apiKey\"")
    }
    buildFeatures {
        buildConfig = true
    }
}
The key ends up in your APK either way, so use a key issued for your app. Without a key the SDK makes no network requests and the map shows a "not configured" notice instead of weather.
Step 2: Show the map and its layers#
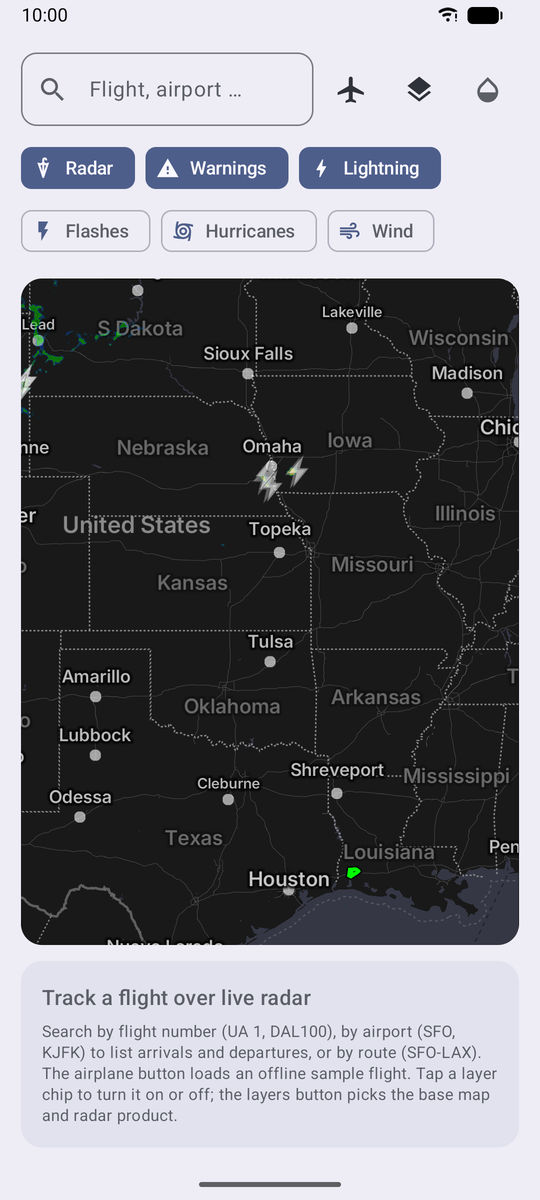
The map is one composable. Layer state lives in your own state holders and flows in as parameters, so a toggle anywhere in your UI is a one-line change.
var radarEnabled by remember { mutableStateOf(true) }
var overlays by remember { mutableStateOf(setOf(Overlay.Warnings, Overlay.Lightning)) }
var mapStyle by remember { mutableStateOf(MapStyle.Gray) }

MyRadarMap(
    modifier = Modifier.clip(RoundedCornerShape(16.dp)),
    initialCamera = MapCamera(LatLng(37.5, -96.0), zoom = 5f),
    mapStyle = mapStyle,
    radarEnabled = radarEnabled,
    overlays = overlays,
)
The chips row is a FlowRow over Overlay.entries; each FilterChip adds or
removes its overlay from the set.
FlowRow(horizontalArrangement = Arrangement.spacedBy(8.dp)) {
    for (overlay in Overlay.entries) {
        val on = overlay in overlays
        FilterChip(
            selected = on,
            onClick = { overlays = if (on) overlays - overlay else overlays + overlay },
            label = { Text(overlay.displayName) },
        )
    }
}
Step 3: Let users dial in opacity#
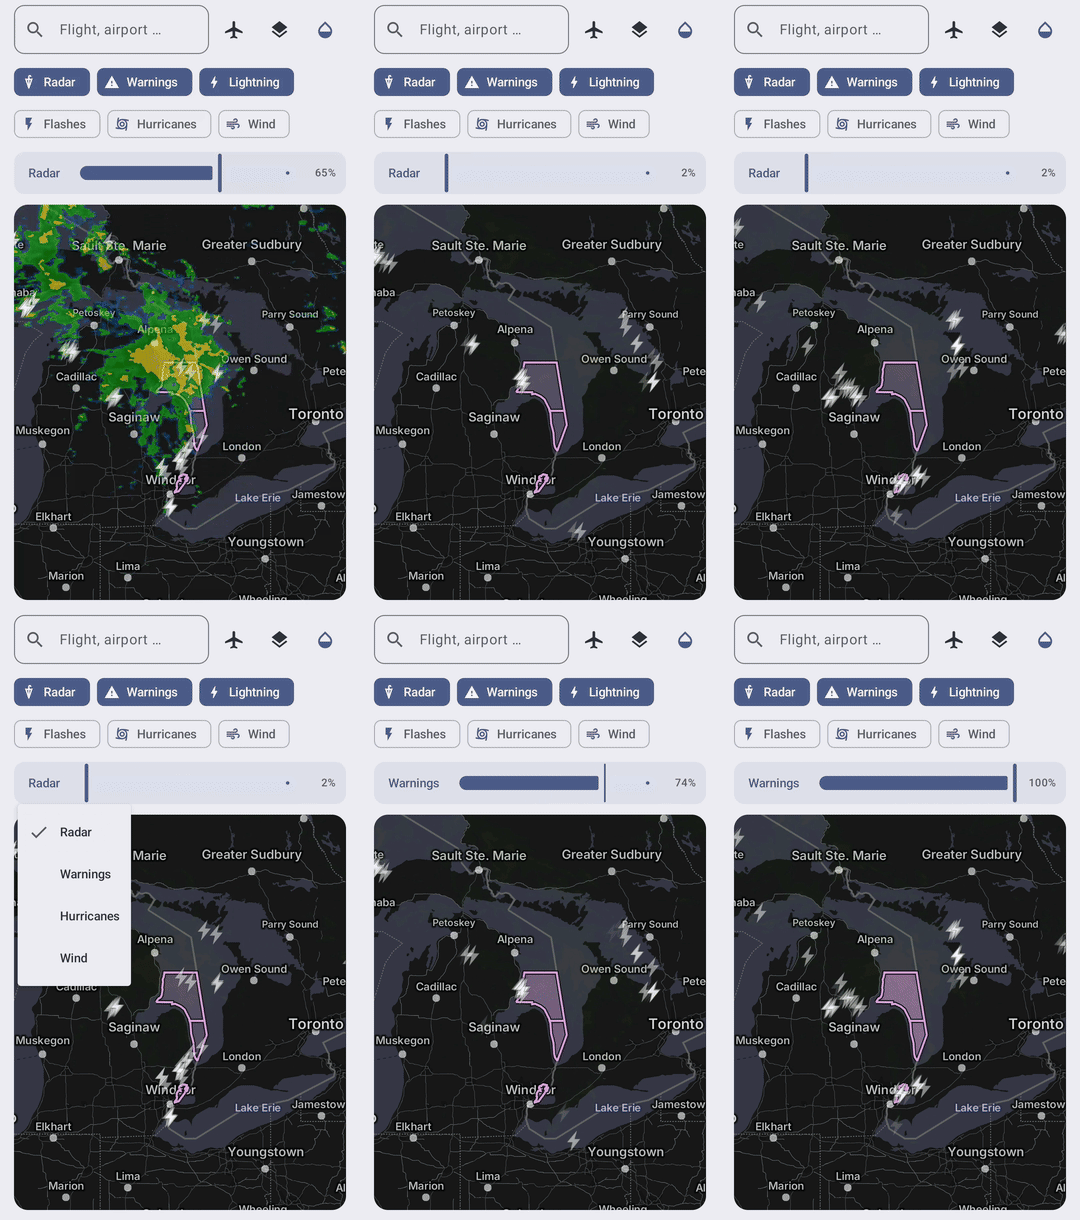
Radar has its own opacity; warnings, hurricanes and wind each take one too. The demo keeps a value per layer in state and passes them in two parameters. One picker plus one slider is enough UI, because the slider just reads and writes whichever value the picker selects.
var radarOpacity by remember { mutableStateOf(0.65f) }
val overlayOpacities = remember { mutableStateMapOf<Overlay, Float>() }

MyRadarMap(
    radarOpacity = radarOpacity,
    overlays = overlays,
    overlayOpacities = overlayOpacities.toMap(),
)

// The picker offers radar plus every overlay where `supportsOpacity` is true.
val opacityLayers = Overlay.entries.filter { it.supportsOpacity }   // Warnings, Hurricanes, Wind
var target by remember { mutableStateOf<Overlay?>(null) }           // null selects radar
val value = target?.let { overlayOpacities[it] ?: it.defaultOpacity } ?: radarOpacity

Row(verticalAlignment = Alignment.CenterVertically) {
    LayerPicker(opacityLayers, selected = target, onSelect = { target = it })   // a DropdownMenu
    Slider(
        value = value,
        onValueChange = { v ->
            val layer = target
            if (layer == null) radarOpacity = v else overlayOpacities[layer] = v
        },
        modifier = Modifier.weight(1f),
    )
    Text("${(value * 100).roundToInt()}%")
}
Lightning is drawn as markers and has no opacity, so it is left out of the picker. Warnings start at the SDK default of 40 percent; watches draw at half of whatever you set for warnings.
Step 4: Draw the flight#
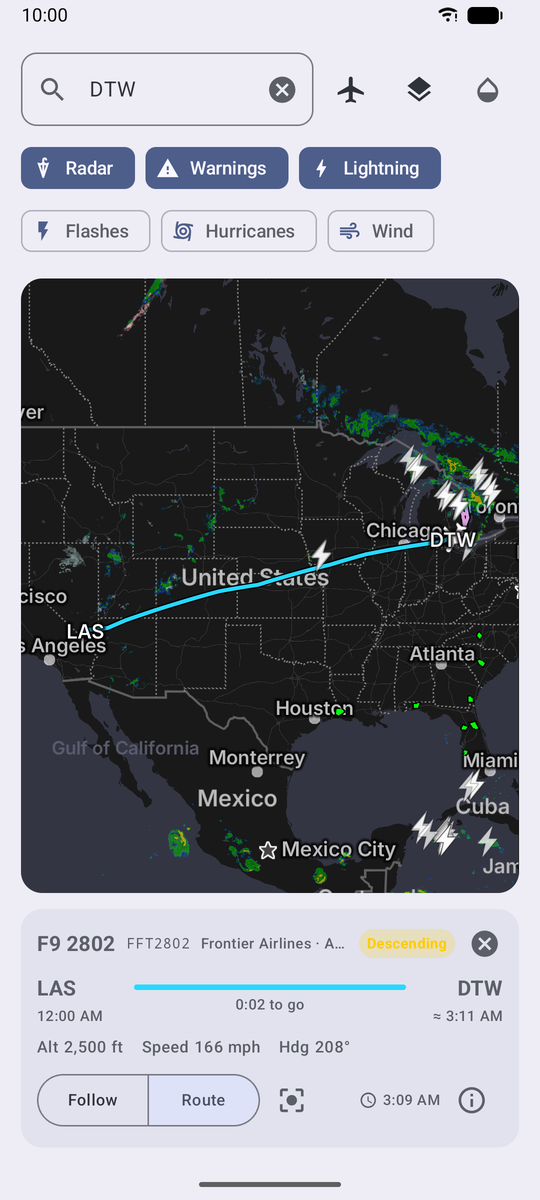
Two polylines and a few markers describe a flight. The flown path is the
aircraft's recorded track; the remaining route is a great circle to the
destination, drawn dashed. The aircraft marker is any Bitmap that points
north, rotated by the reported heading. Colors are ARGB ints and sizes are in dp.
val lines = listOf(
    MapPolyline(id = "flown", coordinates = track,
        color = Color.rgb(38, 217, 255), widthDp = 3f, outlineColor = Color.argb(153, 0, 0, 0)),
    MapPolyline(id = "remaining", coordinates = GreatCircle.path(position, destination.coordinate),
        color = Color.argb(217, 255, 255, 255), widthDp = 2f, dashPattern = listOf(8f, 6f)),
)

val pins = listOf(
    MapMarker(id = "origin", coordinate = origin.coordinate,
        icon = MapMarker.Icon.Text(origin.displayCode, Color.WHITE)),
    MapMarker(id = "aircraft", coordinate = position,
        icon = MapMarker.Icon.Image(planeIcon), heading = trueHeading,
        userInfo = mapOf("callsign" to callsign)),
)

MyRadarMap(
    polylines = lines,
    markers = pins,
    onMarkerTap = { marker -> show(marker.userInfo["callsign"]) },
)
Replacing the lists redraws the layer, so pushing a new aircraft position every
ten seconds is all it takes to animate the plane. Create the plane Bitmap
once and reuse it: the SDK caches encoded images by instance, and a bitmap made
with Bitmap.createBitmap keeps its dp size on screen.
Step 5: Follow the plane or show the route#
Two camera modes, two parameters. Follow pins an exact zoom so the radar keeps morphing smoothly; Route fits every point of interest.
// Follow: exact center and zoom. Whole-number zooms keep motion morphing on.
MyRadarMap(camera = MapCamera(position, zoom = 6f))

// Route: fit origin, aircraft and destination.
MyRadarMap(
    visibleRegion = CoordinateRegion.fitting(
        listOf(origin.coordinate, position, destination.coordinate),
        paddingFraction = 0.35,
    ),
)
The map moves only when the value you pass changes, so users can pan freely in
between. Pass null to leave the camera under the user's control.
Step 6: Make it work in landscape#
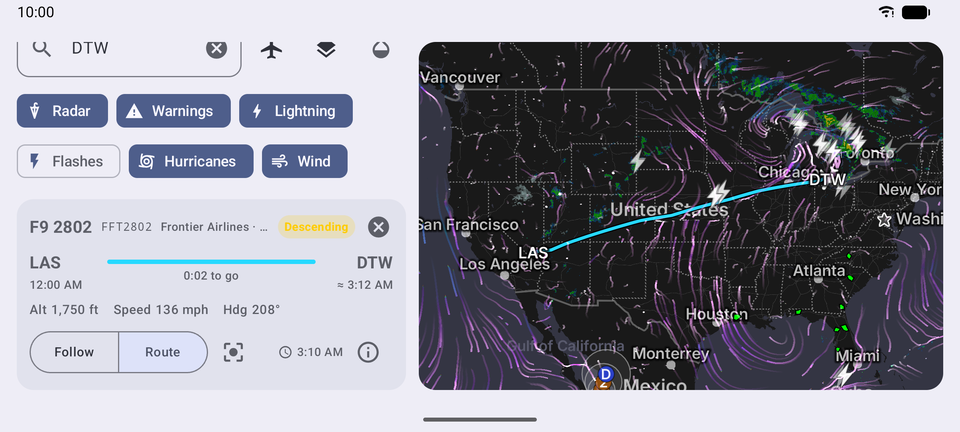
Keep one map instance and only change its container. Compose's
movableContentOf moves the same map between a Row and a Column without
recreating it, so rotation never interrupts the radar loop. The demo also
declares configChanges for orientation in its manifest, so the activity
itself survives rotation.
val map = remember {
    movableContentOf { modifier: Modifier ->
        MyRadarMap(modifier = modifier, overlays = overlays, markers = tracker.markers /* … */)
    }
}

BoxWithConstraints {
    if (maxWidth > maxHeight) {
        Row {
            Column(Modifier.width(360.dp).verticalScroll(rememberScrollState())) { controls(); flightCard() }
            map(Modifier.weight(1f).fillMaxSize())
        }
    } else {
        Column {
            controls()
            map(Modifier.weight(1f).fillMaxWidth())
            flightCard()
        }
    }
}
Step 7: Show attributions#
Apps that ship the SDK must display its open source licenses and data attributions. The demo puts them behind the info button on the flight card.
val names = remember { MyRadarMapView.licensesAndAttributions(context).joinToString(", ") { it.name } }
Text("Map: $names", style = MaterialTheme.typography.labelSmall)
Where the flight data comes from#
This part is the demo's, not the SDK's, but it shows how little is needed.
| Need | Source |
|---|---|
| Position, heading, speed, aircraft type | api.adsb.lol live ADS-B (keyless, ODbL) |
| Recorded track for the current leg | adsb.lol per-aircraft trace files, with OpenSky as a fallback |
| Filed route with airport coordinates | api.adsb.lol route lookup, with adsb.lol's static route files as a fallback |
| Airport lookup by IATA code | hexdb.io |
| Airline name | api.adsbdb.com |
| Nearest airport to the track start | bundled OurAirports list (public domain) |
Scheduled times are not published for free, so arrival is estimated from distance and ground speed, and the departure time comes from the recorded takeoff when available.
Tips from building it#
- Position the camera at whole-number zooms (
MapCameraorsetCenter(center, zoomLevel, animated)) when you want motion-vector morphing. Half-step zooms and continent-wide views fall back to a cross-fade. - Lightning rides on the radar timeline. It only shows while the radar layer is enabled.
- Markers point north when unrotated. Draw your icon pointing up, then let
headingdo the rest. - One map instance. Avoid
if/elsebranches that placeMyRadarMapat different points in the composition; the map would be torn down and rebuilt. UsemovableContentOfwhen the layout has to change. - Use an emulator with at least two CPU cores. The rendering engine needs them; phones always have them.
The complete demo source is on GitHub in MyRadar-SDK-Samples/android-demo.